One factor I particularly like about Linux is the wonderful and huge array of selections in virtually the whole lot. Don’t like one utility for one thing? There are often a number of extra you’ll be able to select from. Don’t like how the desktop works? Pick one in every of many different desktops. Don’t just like the window decorations in your desktop? There are many others you’ll be able to obtain and check out.
What in the event you do not like one little factor about your selection of window decorations—and all different units of decorations will not be even shut?
One of some great benefits of open supply is that I can change something I would like. So I did.
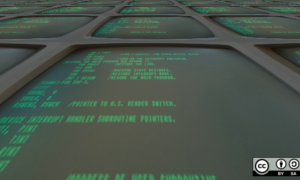
I take advantage of the Alienware-Bluish theme on my Xfce desktop. I like its futuristic look, the cyan and grey colours that match my darkish main shade schemes—and typically my moods. It has a pleasant 3D reduction within the corners, and the corners and edges are large sufficient to seize simply, even with my Hi-DPI decision. Figure 1 reveals the unique Alienware-Bluish decorations with the gradient-black-324.0 shade scheme I desire.
Figure 1. An lively window (with the main target) utilizing the unique Alienware-Bluish decorations (David Both, CC BY-SA 4.0)
Two issues hassle me about this window. First, the depth of the window identify within the title bar for lively home windows is simply too uninteresting for me. The inactive home windows have a vivid white title that pulls my eye greater than the uninteresting cyan shade of the lively title.
Second, I like darkish wallpapers, as you’ll be able to see in Figure 1. Because the underside fringe of the window doesn’t have a cyan spotlight, it may be tough to find out the place the underside of the home windows are positioned, particularly when there are quite a lot of overlapping home windows open.
Pretty minor annoyances, I do know, however they simply bothered me. And that is likely one of the coolest issues about open supply: I can modify something I would like, even for trivial causes. It simply takes a bit of information, which I’m sharing with you.
Where are the ornament information?
The very first thing I wanted to do was find the information for the decorations I’m utilizing, Alienware-Bluish. I do know this due to the numerous decorations I’ve downloaded over time.
All of the ornamental themes I obtain are positioned within the /usr/share/themes/ listing so all customers may have entry to them. Each theme is positioned in a subdirectory, so the Alienware-Bluish theme is positioned within the /usr/share/themes/Alienware-Bluish/xfwm4/ listing. The xfwm stands for xf window supervisor model 4.
If you put in your themes in your house listing, they are going to be positioned within the ~/.native/share/themes/Alienware-Bluish/xfwm4 listing. Themes saved in your house listing will not be out there to different customers in your pc.
Preparation
I do not wish to work on the unique information for something vital like a theme, so I used my very own non-root account to repeat the /usr/share/themes/Alienware-Bluish listing and its contents to a brand new listing, /usr/share/themes/Alienware-Bluish-2. This offers me a secure place to work with out inadvertently damaging the unique past restore. It additionally copies information and modifications the possession of the copied information to my very own account, so I can copy and edit the information.
Besides, I wish to preserve the unique so I can proceed to make use of it.
Getting began
View the information within the /usr/share/themes/Alienware-Bluish-2/xfce listing utilizing Thunar or one other file supervisor that allows you to view picture thumbnails, then zoom in to extend the scale of the pictures. Expand the pictures so you’ll be able to see them higher. Each *.xpm (X11 Pixmap) file is a picture of a small window body part, as you’ll be able to see in Figure 2.
Figure 2: The information that make up the varied segments of a window (David Both, CC BY-SA 4.0)
Notice that the completely different parts every have an lively and an inactive model. In the case of this theme, they’re largely the identical. I now personal these copied information, so I can copy and edit them.
Look particularly on the bottom-active.xpm and bottom-inactive.xpm information. These are the 2 information that outline the look of the underside of the window. These two pictures are just one pixel large, so they’re basically invisible in Figure 2. The window supervisor makes use of as many situations as essential to create the underside fringe of the window.
Themes for different desktops might use completely different file codecs.
Making the modifications
First, I modified the title shade. The themerc file accommodates textual content configuration knowledge that defines a number of points of the title bar. This file is an ASCII textual content file. Here is the content material for the theme:
full_width_title=true
title_alignment=heart
button_spacing=2
button_offset=30
button_layout=S|HMC
active_text_color=#699eb4
inactive_text_color=#ffffff
title_vertical_offset_active=5
title_vertical_offset_inactive=5
The hex numbers within the textual content shade entries outline the colours for lively and inactive title textual content. To change the lively title textual content, I want to find out what worth to make use of on this subject. Fortunately, there’s a software that may assist. The KcolorChooser can be utilized to pick a shade from the colour palette, or the Pick Screen Color button can be utilized to decide on a shade already displayed on the display.
I used this shade picker to find the cyan spotlight within the facet of the window, however I discovered it just a bit too vivid for the underside. I wished it a bit much less vivid, so I used the instruments on the KcolorChooser to regulate the colour and depth to my choice. You can see the lead to Figure 3.
Figure 3. Using the KcolorChooser to pick a particular shade (David Both, CC BY-SA 4.0)
The KcolorChooser will be put in if you do not have it already. On Fedora and different Red Hat-based distros, you should use the next command:
dnf -y set up kcolorchooser
If you do not have already got the KDE desktop or any of its instruments put in, this command will set up a lot of KDE libraries and different dependencies. It was already put in on my workstation as a result of I’ve the KDE Plasma desktop put in.
After deciding which shade I wished, I obtained the hex digits for that shade from the HTML textual content field. I then typed these into the themerc file so the active_text_color line appears like this:
active_text_color=#00f1f1
The subsequent half, altering the bottom-active.xpm picture file, is a bit more difficult. I used GIMP to change the bottom-active.xpm file, however you should use any graphics editor you might be snug with. One catch: the picture is so small that it must be enlarged by an enormous quantity to be an inexpensive dimension for modifying. I discovered that 8,000% labored nicely on my show. You can see this in Figure 4. This picture is 6 pixels excessive by 1 pixel large and black and shades of darkish grey.
Figure 4. The bottom-active.xpm file proven at 8,000% magnification in GIMP (David Both, CC BY-SA 4.0)
I used the KcolorChooser to discover a shade of cyan a bit of darker than that on the facet and prime edges of the window. After some enjoying round with it, I settled on the shade #10b0ae, which I then copied into the textual content subject of the GIMP colours dialog. I had so as to add this dialog to the dock space on the higher proper of the GIMP window by deciding on Menu Bar Tools > Dockable Dialogs > Colors. Alternatively, I may have used the colour picker, the eye-dropper icon, within the GIMP Colors dialog to easily choose the colour from the pattern show space of the KcolorChooser.
At any price, I now had the colour I preferred within the GIMP shade dialog. I used the Rectangle Select software to pick the three pixels highlighted in Figure 5 and the Bucket Fill software to fill the chosen space with the brand new shade. Figure 5 reveals the ultimate shade.
Figure 5. The modified bottom-active.xpm file with the addition of cyan (David Both, CC BY-SA 4.0)
Exporting the revised file
GIMP transformed the .xpm file into an information format it may use, however it could possibly’t save the info straight right into a .xpm file. Instead, I used the export perform to avoid wasting the file. This was not a giant deal, however a bit sudden the primary time.
During the export, I used to be offered with a dialog asking for an Alpha Threshold worth. I do not know sufficient about GIMP or manipulating graphics information to know what that’s, so I left it alone and clicked on the Export button.
Testing
The modifications I made to this theme are simple to check. I merely used the Window Manager to pick the Alienware-Bluish-2 theme. This hundreds the brand new theme immediately, so I can see the outcomes immediately.
Had I not preferred the outcomes, I may have made extra modifications and examined once more. At this level, nevertheless, I might have needed to change again to the unique Alienware-Bluish theme (or every other theme) after which again to the Alienware-Bluish-2 theme to confirm the change. The revised information will not be loaded till the theme is re-read.
Figure 6 reveals the revised theme utilizing the cyan highlights within the backside window edge. I believe it appears significantly better.
Figure 6. A window exhibiting the altered backside edge (David Both, CC BY-SA 4.0)
Final ideas
I had no thought the best way to repair minor issues and annoyances with window decorations till I began this little challenge. It did take a while and analysis to determine how to do that. I realized there’s an xpm graphics format, and I realized a bit of extra about working in GIMP, together with the best way to export into that file format. I additionally found this was a reasonably simple change to make.
I nonetheless do not feel I’ve the ability or artistic imaginative and prescient for graphics to design a very new window ornament theme. But now I can simply make minor modifications to themes another person has created.